What Is A Wicking Bed
So as you may know, we have recently moved from Washington, the state of perpetual rain to Arizona….. the desert. After being here for just a year I am ready to figure out the best local and eco-friendly gardening methods available for growing vegetables in the desert.
My posts may contain affiliate links. If you purchase something from one of our links we may earn a small commission, doesn’t cost you any more but helps us to bring you more great tips, recipes and garden ideas. Also, as an Amazon Associate, I earn from qualifying purchases.
Here in Phoenix, we can garden almost year round. The summers do get a little hot (110 degrees plus), even a little toasty for my tomatoes. I didn’t know you could grow sun dried tomatoes on the vine until we moved here :). They are trying to tough it out for another month or so then as it cools they will (fingers crossed) perk back up.
Another change from moving from Washington and being on a deep well which supplied our family with as much water as we could handle, to being hooked up to chlorine filled city water, can be a challenge in itself for water conservation and the health of my precious veggies. In an effort to save water, I did some research on the best garden bed designs. I looked at everything from Aquaculture to in a regular in ground garden.
For the love of tinkering
Since I have a love of tinkering that I inherited from my father, I was leaning towards setting up an Aquaponic system that would allow me to raise fish and vegetables at the same time, but my family nicely pointed out to me that instead of having 200 Tilapia based protein sources in my backyard I would end up with 200 pet fish that I would eventually have to name… so on with the next idea…. The next best grow bed I found was something called a Wicking Bed.
A Wicking Bed is actually quite simple to construct and should only need watered about once or twice a week even in the hot of the summer (in theory). It should use up to 50% less water than a conventional raised garden. A Wicking Bed can be made out of almost any bucket, barrel or trough you have laying around the yard. I opted for a wooden raised bed design for our backyard so I am constructing ours out of non-treated wood.
So off I went to the local hardware store to purchase supplies. I decided to make a 4x10ft bed out of 2×4’s, 6 boards high.
Wicking Bed Supplies
Here are the other supplies I purchased for the bed:
- 18 – 2x4x10 white wood boards
- 1 corrugated black pipe 12′ long
- 1 roll black plastic
- 1 roll landscape / weed fabric
- 2.5″ screwsor (nails if you prefer)
- 3′ section of 2″ pvc pipe
- 1 pvc elbow
- 1 zip tie ( had on hand)
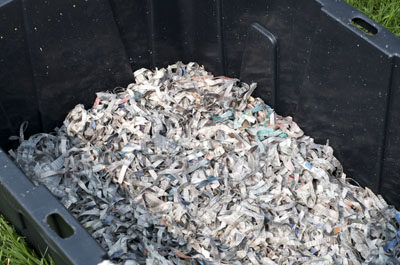
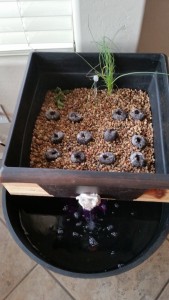
So what is a Wicking Bed exactly and what does it do? As I explained it to my daughter, I am building a pond under my garden. A wicking bed is a raised garden bed, half the depth is lined with plastic or a pond liner, filled with gravel, then topped off with water. This is the reservoir for the garden. On top of that is a layer of landscape fabric to separate the gravel from the growing medium, then topped off with a compost enriched soil in which to grow my vegetables.
In theory, the soil acts as a wick and absorbs the water from below up into the soil and to the roots of the plants. Little water is lost due to evaporation and the plants have a constant water supply. This is also a great bed to add worms to due to the fact that it has a layer of constant moisture. I would think that letting the bed dry out in between fillings may be a good idea, but only time will tell. This is my first try at this type of garden so I will keep you updated on how well it performs.

You may have seem similar small gardens and flower pots with a similar concept as this. We are just doing it on a much bigger scale.
How I made the bed:
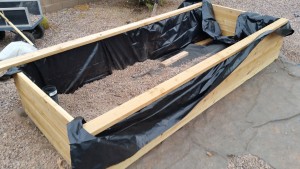
The first thing I did was cut pieces for the short side of the beds. I cut 6 of the 2x4x10’s into 2-4′ sections and 1-2′ section. The 2′ sections are the leftovers but were used to support the corners of the beds. As I built the long sides, I attached 3 of the 2′ pieces to each wall. One on each end, and one in the center. Sorry, I don’t have a pic of the actual construction at this time. Here is an image of one of the side walls:
Once I had both of the 10 foot sections assembled. We moved them over to the location that the bed was going to be located. We then used the 4′ sections of 2×4’s to attach the two sides together and formed the short sides of the bed.
One thing to remember after your bed is built to make sure it is fairly level on the site. Due to the fact that you are making a “pond” under your raised garden bed, you do not want the water level at either side of the bed to be significantly higher than the other.
After the bed is leveled. Line the bottom 10-12″ with the plastic, Pond Liner, or water resistant material of your choice. Make sure to leave extra around all sides of the bed. This can be trimmed later. As you fill the bed with gravel, the plastic will move and you do not want to come up short. The 10-12″ is the optimal amount for the reservoir per the research I found. The soil level should also not exceed 12″ or so in order for the water to wick high enough to reach your plants.
The next step:
The next step is to layout your perforated pipe along the bottom of your bed. Some people will use extra long pipe and snake it throughout the bed. I opted for one piece down the middle of the bed. Make sure to have one end of the pipe sticking out of the raised bed by a couple of inches. This is where you will monitor and fill your “pond” from. You can see the pipe at the end of the bed. I did have to adjust it so it was raised up above the bed to ensure that soil doesn’t enter it and cause a blockage once the bed is fully filled and planted.
After the pipe is placed in the bed, you will need to place a layer of landscape fabric over it to prevent the pipe from becoming clogged with sand and debris from the gravel. You can now begin to fill it with gravel on one end if you need to way down the plastic to keep it from moving. There is still one more step that needs completed before the bed is completely filled. You will need to add an overflow pipe.
This pipe will be placed at one end of the bed at ground level out through the wall of the bed. This pipe will be attached to a 90 degree elbow and a small pipe will be added upwards to where your water line/gravel will be. Sorry if this sounds confusing. (I will post more pics soon) This will prevent the bed from filling with water past the gravel line and keep the soil from turning into a soggy mess.
What it does….
This design will also allow you to drain the bed in winter to prevent it from freezing and damaging your plants roots. I will add more pics as I complete this bed. Thanks for tagging along with me on my new gardening adventures. Look for another post soon.
I would love to know what your favorite garden bed design is. Also if anyone had had experience with a wicking bed I would love to see pics and hear about it. Please leave you comments below.